Let me tell you about my absolute favorite dessert – this dreamy Chocolate Strawberry Cheesecake that’s been stealing hearts at every gathering I’ve brought it to! Picture this: a rich chocolate cookie crust that gives that perfect crunch, creamy vanilla-kissed cheesecake filling that practically melts in your mouth, and those gorgeous fresh strawberry slices on top that add just the right amount of fruity freshness. After years of baking cheesecakes (and yes, making plenty of cracked ones along the way!), I’ve perfected this version – it’s simpler than most but tastes like you spent all day on it. Trust me, your friends will beg for the recipe!

Why You’ll Love This Chocolate Strawberry Cheesecake
Listen, I know what you’re thinking – “cheesecake sounds fussy.” But trust me, this one’s different. Here’s why it’s become my go-to dessert for every occasion:
- That foolproof texture – creamy without being dense, light without crumbling. The secret? Beating the cream cheese until it’s practically singing (more on that later).
- Chocolate and strawberries were made for each other. The bittersweet crust balances the tangy cream cheese, while fresh berries cut through the richness.
- It looks fancy but couldn’t be simpler. No water bath! Just mix, bake, and let the oven do its magic.
- Leftovers? Ha! My kids start hovering near the fridge the second they smell it baking. It’s that good.
Last summer, I brought this to a potluck and watched three people sneak second slices when they thought no one was looking. Need I say more?
Ingredients for Chocolate Strawberry Cheesecake
Okay, let’s gather our treasures! I’ve made this cheesecake so many times I could probably do it in my sleep, but here’s where I never cut corners. Every ingredient matters:
- 200g chocolate cookies (the kind you’d happily snack on – I use Oreos with the filling scraped out, but any good chocolate biscuit works)
- 100g unsalted butter, melted (and yes, it must be unsalted – we control the salt here!)
- 500g cream cheese at room temperature (this is NON-NEGOTIABLE – cold cream cheese will leave lumps and break your heart)
- 150g granulated sugar (regular white sugar is perfect here – no fancy substitutes)
- 3 large eggs, also at room temperature (take them out when you start prepping – cold eggs can make the filling separate)
- 200g fresh strawberries (look for ripe but firm ones – they’ll slice beautifully)
- 1 tsp pure vanilla extract (imitation vanilla is a crime against cheesecakes)
See that note about room temperature ingredients? I once tried rushing this with cold cream cheese and ended up with lumpy cheesecake that cracked like the Grand Canyon. Learn from my mistakes, friends!
Equipment Needed
Before we dive into mixing, let’s talk tools! You don’t need fancy equipment for this chocolate strawberry cheesecake – just a few basics that probably live in your kitchen already. Here’s what I always grab:
- 9-inch springform pan – The absolute MVP! The removable sides make serving cheesecake a breeze without ruining your beautiful work.
- Food processor or rolling pin – For crushing those cookies into oblivion. (I’ve been known to take out stress on those cookies with a rolling pin – very therapeutic!)
- Mixing bowls – One for the crust, one for the filling. No need to wash between if you’re smart about the order.
- Electric mixer – A hand mixer works fine, but if you’ve got a stand mixer, this is its time to shine.
- Spatula – For scraping every last bit of that creamy filling into the pan. Waste not, want not!
- Oven – Obviously. But check yours with an oven thermometer – mine runs hot and I learned the hard way that cheesecakes don’t appreciate surprises.
That’s it! No special gadgets needed. Though if you want to get fancy, a pastry brush for buttering the pan and a microplane for zesting (if you add citrus) never hurt anyone.
How to Make Chocolate Strawberry Cheesecake
Alright, let’s get baking! Don’t let the fancy look fool you – this chocolate strawberry cheesecake comes together in just a few simple steps. I’ll walk you through each one like we’re standing side by side in my kitchen (wine glass optional but encouraged).
Step 1: Prepare the Crust
First things first – that glorious chocolate crust! Grab those cookies and pulverize them until they resemble fine sand. My weapon of choice? A trusty food processor that gets the job done in seconds. No processor? No problem! Seal cookies in a ziplock bag and roll over them with a rolling pin (bonus stress relief!).
Now mix those crumbs with melted butter until it looks like wet sand that holds its shape when squeezed. Press this heavenly mixture firmly into the bottom of your prepared pan – I use the bottom of a measuring cup to get it nice and even. Pop it in a preheated 180°C oven for exactly 10 minutes – just until it smells like chocolate dreams and firms up slightly.
Step 2: Make the Cheesecake Filling
Here’s where the magic happens! Remember those room-temperature ingredients? This is why they matter. Beat your softened cream cheese first alone until it’s completely smooth – no lumps allowed! Gradually add sugar while mixing, then the eggs one at a time, letting each incorporate fully before adding the next.
The moment you add that vanilla, the scent will hit you – pure nostalgia! Keep mixing just until everything is combined and silky smooth. Overmixing incorporates too much air and can lead to cracks (we’ll avoid those!). The perfect filling should slowly ribbon off your beaters.
Step 3: Bake and Cool
Pour that creamy filling over your slightly cooled crust and gently smooth the top. Now the oven gets turned down to 160°C – this lower, slower bake prevents cracking. Bake for about 40 minutes until the edges look set but the center still has a slight jiggle (like jelly, not liquid).
Here’s my secret cooling method: turn off the oven and crack the door open with a wooden spoon. Let the cheesecake chill there for 30 minutes before moving it to a wire rack. This gradual temperature change keeps your masterpiece crack-free!
Step 4: Add Strawberry Topping
The final flourish! Once completely cooled (I mean totally cooled – patience is key!), carefully slice those strawberries and arrange them however you like. Some days I do concentric circles, other times a rustic pile – it always looks stunning!
Now the hardest part – refrigerate for at least 4 hours (overnight is even better). I know, I know! The temptation is real. But trust me, this waiting period lets the flavors develop and texture set perfectly. When you finally slice into it, that first bite will be worth every second of anticipation!

Tips for Perfect Chocolate Strawberry Cheesecake
After countless cheesecakes (and plenty of kitchen disasters!), I’ve learned these foolproof tricks that make all the difference:
- Stop mixing when the filling just comes together – Overbeating adds too much air, which leads to cracks and a texture like sponge cake rather than that velvety creaminess we want.
- Line your pan with parchment paper – Even with a springform, a round of parchment on the bottom guarantees your masterpiece won’t stick when releasing.
- Cool it like you mean it – That gradual cooling in the turned-off oven? Non-negotiable! Rushing this step is the #1 cause of the dreaded cheesecake canyon cracks.
- Room temp is your friend – I can’t stress this enough – cold ingredients don’t incorporate smoothly. Take everything out at least an hour before baking.
Last tip? Breathe! Cheesecakes sense fear. Approach with confidence and a spatula in hand. If you are looking for more amazing dessert ideas, check out our full collection of desserts!
Variations for Chocolate Strawberry Cheesecake
Oh, the possibilities! While I adore the classic version, sometimes I love shaking things up with these delicious twists – each one tested in my kitchen and approved by my toughest critics (aka my family). Here are my favorite ways to play with this recipe:
White Chocolate Dream Crust
For special occasions, I swap the chocolate cookies for white chocolate cookies – those golden vanilla ones with white chocolate chunks work magic! The crust turns this beautiful blonde color that makes the strawberry topping pop even more visually. Just be sure to reduce the sugar in the filling slightly since white chocolate brings extra sweetness.
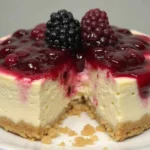
Berry Bonanza Topping
Ran out of strawberries? No problem! Raspberries make a gorgeous tart counterpart to the sweet cheesecake, and their deep red color looks stunning. Blackberries work too – just slice them in half so they lay flat. My summer favorite? A mix of all three berries for a jewel-toned masterpiece! If you love berries, you might also enjoy our recipe for strawberry shortcake cupcakes.
Chocolate Ganache Drizzle
Because sometimes more chocolate is the answer! After arranging the strawberries, I’ll melt dark chocolate with a splash of cream and drizzle it artfully over the top. The contrast between glossy chocolate and fresh fruit is downright elegant. Pro tip: Let the ganache cool slightly so it clings to the berries instead of sliding off.
Citrus Zest Twist
Here’s a secret weapon – add the zest of one orange or lemon to the cheesecake filling. The citrus oils brighten everything up without making it taste fruity. My husband didn’t believe me until he tried it – now he insists on the orange zest version!
The beauty of this recipe? It’s like your favorite little black dress – perfect as is, but so fun to accessorize! Whatever variation you choose, just remember the golden rule: taste as you go and trust your instincts. Happy experimenting! You can find more inspiration for your next baking adventure on our Pinterest page.
Serving and Storing Chocolate Strawberry Cheesecake
Alright, let’s talk about the best part – serving this beauty! After patiently waiting those agonizing 4+ hours (you did wait, right?), run a thin knife around the edge of your springform pan before releasing the sides. Slide a spatula gently under the crust to transfer it to your serving plate – I use two wide spatulas for this delicate operation.
Serving tips:
- Chill means chill – Serve straight from the fridge for perfect slices that hold their shape. Warm cheesecake turns into a delicious but messy puddle!
- Hot knife trick – For picture-perfect slices, dip your knife in hot water and wipe dry between each cut. Works like magic!
- Garnish game strong – A dusting of powdered sugar, mint leaves, or extra strawberry halves make it restaurant-worthy.
Storing secrets:
- Fridge life – Cover tightly with plastic wrap or store in an airtight container for up to 3 days. The strawberries might weep a bit after day 2, but the flavor only gets better!
- Freezing like a pro – Wrap individual slices in plastic wrap, then foil, and freeze for up to 1 month. Thaw overnight in the fridge – perfect for when cheesecake cravings strike unexpectedly!
- No-no zone – Never leave it out more than 2 hours – dairy products and summer picnics don’t mix well.
Fun story – last Christmas, I made three of these cheesecakes and froze them sliced. When surprise guests arrived on New Year’s Eve, I simply pulled out the frozen slices, let them thaw while we had appetizers, and looked like a domestic goddess! The chocolate crust stayed crisp, and no one guessed they weren’t freshly baked. Now that’s what I call a kitchen win!
Nutritional Information
Okay, let’s be real – we’re not eating cheesecake for its health benefits! But because I know some of you (like my calorie-counting sister) appreciate the numbers, here’s the nutritional breakdown per slice, calculated based on 8 generous portions:
- Calories: 320 kcal (worth every bite!)
- Fat: 20g (remember, cream cheese and butter are the stars here)
- Saturated Fat: 12g (that’s what makes it so luxuriously creamy)
- Carbohydrates: 28g (mostly from our beloved cookie crust)
- Sugar: 22g (the strawberries and sugar teaming up)
- Protein: 5g (thank you, eggs and dairy!)
- Sodium: 180mg (not bad for dessert!)
Important note: These values are estimates based on the exact ingredients I use. Your numbers might vary slightly depending on your cookie brand, strawberry size, or whether you sneak extra chocolate drizzle (no judgment here!).
Now, if you’ll excuse me, I’m going to enjoy my slice guilt-free – life’s too short not to savor every creamy, chocolatey, strawberry-topped bite! If you’re looking for other decadent treats, check out our classic chocolate lava cake.
Frequently Asked Questions
Over the years, I’ve gotten so many questions about this chocolate strawberry cheesecake – and I love helping fellow bakers avoid the mistakes I’ve made! Here are the ones that come up most often:
Can I use frozen strawberries instead of fresh?
You can, but with a catch! Frozen berries release way more liquid when thawed, which can make your topping soggy. If you must use frozen, thaw them first in a strainer over a bowl, pat them very dry with paper towels, and maybe even toss with a teaspoon of cornstarch to absorb excess moisture. Honestly though? Fresh is best here – the texture and brightness just can’t be beat!
How do I prevent cracks in my cheesecake?
Oh, the heartbreak of that first crack! Here’s what I’ve learned: 1) Don’t overmix the batter (stop when it’s just smooth), 2) Bake at a lower temperature (that 160°C is magic), and 3) Most importantly – let it cool gradually in the turned-off oven with the door cracked. I use a wooden spoon to prop the door open for about 30 minutes before moving it to the counter. Works every time!
Can I make this cheesecake gluten-free?
Absolutely! Just swap the chocolate cookies for your favorite gluten-free chocolate biscuits (I like the ones made with almond flour). The crust might be slightly more crumbly, but pressing it firmly and letting it chill thoroughly helps. Bonus – nobody will guess it’s GF unless you tell them!
Why does my cheesecake filling sometimes turn out lumpy?
Room temperature ingredients are your best friends here! Cold cream cheese doesn’t blend smoothly no matter how long you beat it. Take it out of the fridge at least 2 hours before baking (or microwave in 10-second bursts if you’re impatient like me). Same goes for eggs – cold ones can make the filling separate. Patience pays off with that velvety texture!
Can I make this ahead of time?
Not only can you, you should! Cheesecake actually tastes better after chilling overnight as the flavors meld. Just wait to add the strawberry topping until about an hour before serving so they stay fresh-looking. The baked cheesecake (without topping) keeps beautifully in the fridge for up to 3 days or frozen for a month – my secret weapon for stress-free entertaining! For more make-ahead ideas, check out our recipes index.
Try This Recipe and Share Your Results!
Well, my friend, you’ve made it to the end of our chocolate strawberry cheesecake journey together! Now comes the best part – it’s your turn to bring this dreamy dessert to life in your own kitchen. I can’t wait to hear how it turns out for you!
When you make it (because you are going to make it, right?), snap a photo of your beautiful creation and tag me on Instagram – I’d love to see your version! Did you stick with the classic recipe or try one of those fun variations? Maybe you discovered an even better trick along the way? Share your tips and triumphs with me! Follow us on Pinterest for more visual inspiration!
Trust me, once you taste that first creamy bite with the perfect crunch of chocolate crust and burst of fresh strawberry, you’ll understand why this recipe has become my signature dessert. It’s pure magic on a plate, and now it can be yours too. So preheat that oven, grab your favorite mixing bowl, and let’s make some cheesecake memories together!
Happy baking, and don’t forget – the most important ingredient is always love (and maybe just a little bit of butter). Now go forth and cheesecake!